Install OpenClaw as a sequence of independently verifiable parts: runtime, Gateway, model provider, local chat and finally Telegram. On Mac or Linux, use the official installer; Windows offers a native Hub app, PowerShell CLI and WSL2. Keep one owner and one model route for the first deployment. A useful acceptance test checks not only that your message receives a reply, but also that an unapproved sender cannot operate the assistant.
Logo source: OpenClaw official documentation.
This guide covers installation, an Ollama provider connection, owner-only Telegram access and first-install verification. It adds an operational method: separate “installed,” “able to answer” and “authorized to act.” Those are three different outcomes. A healthy process can have a broken provider, and a fluent answer can arrive through an unintended cloud route.
Map the system before installing it
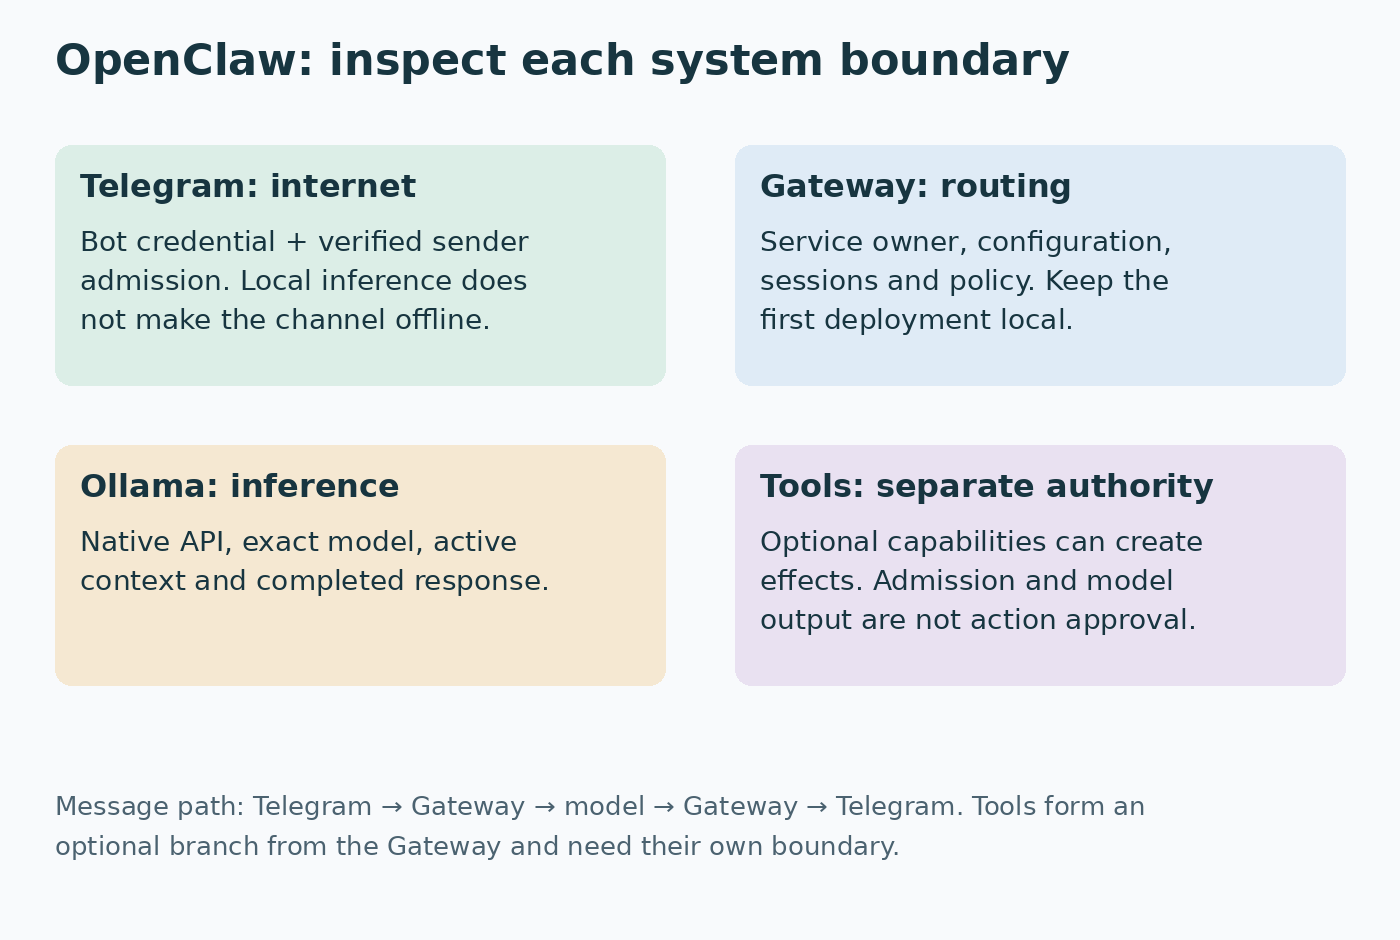
The Gateway manages channels, configuration and agent execution. The model provider generates responses. A channel such as Telegram delivers messages. Tools and plugins can create effects beyond generating text. These components cross different boundaries, so start by drawing where each runs and which data it receives.
For the same-host practice setup, OpenClaw and Ollama run on one computer. The Gateway listens locally on its configured port, and Ollama normally serves its native API on 11434. Telegram is an internet messaging service. Using local inference does not make Telegram messages offline or remove the need to protect the bot token.
If your goal is simply local text chat, finish the Ollama installation walkthrough first. Add OpenClaw when you need channel routing or a controlled workflow. Installing an agent framework to solve a missing model download adds layers before the underlying problem is understood.
Choose one installation environment
Check the current OpenClaw installation requirements immediately before setup. At this revision, the documentation lists Node 24.16+ or 26.1+, with Node 26 recommended. Older instructions mentioning Node 22 are not the current baseline. The official installer can provision a supported runtime; pnpm is for source builds, not a requirement for a normal packaged install.
| Environment | Practical route | Record this boundary |
|---|---|---|
| macOS or Linux | Official installer and managed Gateway | OS user that owns the service |
| Windows desktop | Signed Windows Hub installer | App-owned or existing Gateway |
| Windows terminal | Native PowerShell CLI or WSL2 | Which environment owns config and service |
If you manage Node yourself, use the official Node download page and compare the installed version with OpenClaw's supported range. “LTS” alone is not a compatibility test. Multiple Node installations can make your terminal and background service resolve different executables.
Do not alternate casually between a Windows terminal, a WSL shell and a container. Each can have its own home directory and loopback interface. Record where the Gateway runs before configuring a provider address. A localhost request from the Gateway's environment tests something different from a successful request in a Windows browser.
macOS and Linux: install, then choose service ownership
The official installation command is:
curl -fsSL https://openclaw.ai/install.sh | bashReview the official script before executing it. The installer runs onboarding, so do not blindly repeat a second setup flow when it has already completed. Check openclaw –version in a fresh terminal and preserve the version in your deployment note.
The getting-started guide distinguishes foreground Quick start from a background service. For a foreground trial, keep its terminal open. When moving that Gateway to managed operation, stop the foreground instance with Ctrl+C, then run:
openclaw gateway install
openclaw gateway status
openclaw dashboard
The current service route uses a LaunchAgent on Mac and a systemd user unit on Linux or WSL2. Gateway status should identify a running service and local listener; the default documented port is 18789. Opening the dashboard checks the Control UI connection, while sending a harmless chat message checks the model route.
Record the operating-system account used during setup. Installing under one user and later editing another user's configuration creates an apparently ignored change. For a server intended to run unattended, verify the actual service lifecycle and login requirements rather than assuming desktop behavior proves restart resilience.
Windows: Hub, native CLI and WSL are distinct choices
The Windows platform guide recommends Windows Hub for the desktop experience. Follow its signed x64 or ARM64 release links appropriate to the machine. First-launch local setup can provision an app-owned WSL Gateway; advanced connection settings can use an existing Gateway instead. Avoid configuring a second instance when you already have one.
For native terminal setup, use the documented PowerShell installer:
iwr -useb https://openclaw.ai/install.ps1 | iex
openclaw --version
openclaw gateway status --json
For a Linux-compatible Gateway, use WSL2 deliberately. Microsoft's WSL installation guide documents the Windows-side setup. Once installed, run Linux installation commands inside the distribution rather than pasting PowerShell commands there. Save the distro name with your deployment record.
If Ollama runs on Windows and the Gateway runs inside WSL, test provider reachability from the WSL shell. Network mode and host access determine the correct address. Do not solve every connection failure by binding Ollama to every interface. First decide whether both processes can run in the same environment for the baseline.
Configure a provider before Telegram
Use openclaw onboard for guided provider setup, or openclaw configure to revisit settings. Start with a synthetic local chat before adding a channel. This reduces the number of possible causes when a later Telegram message fails.
The model CLI reference distinguishes catalog, configured defaults and authentication. Inspect both:
openclaw models list
openclaw models status
A listed model is inventory evidence. The configured default and credentials are routing evidence. Neither is a completed task. A successful live reply is still required. If a chat session has a model override, inspect that session rather than assuming the global default explains it.
For a hosted provider, know which account receives the request and which quota or bill applies. For Ollama, identify the actual daemon and local model. A fallback can make an assistant appear reliable while sending work through a different route, so inspect fallback settings as part of the baseline and keep them within the intended data boundary.
Ollama: native API, loaded model and usable context
OpenClaw's Ollama provider overview specifies the native endpoint. Use a base URL such as http://127.0.0.1:11434 without /v1. The OpenAI-compatible path is not interchangeable with the native integration; incorrect routing can produce tool-call JSON as ordinary text.
The Ollama setup reference explains Local only, Cloud + Local and the separate Ollama Cloud route. Choose Local only for this practice deployment. Automatic guided discovery considers loaded models with tool support and at least 16K of confirmed context. An installed model sitting idle on disk may therefore be absent from automatic candidates.
Inspect Ollama independently:
ollama list
ollama ps
curl --fail --show-error http://127.0.0.1:11434/api/tags
Use guided explicit selection for an installed idle model, or load the intended eligible model before automatic discovery. Do not respond to an empty candidate list by downloading many unrelated models. The relevant questions are endpoint, installed tag, loaded state and advertised capabilities.
The model-discovery reference provides a lean inference test that skips the agent's full tools, memory and session context. Substitute the exact installed model you intend to test:
openclaw infer model run --local \
  --model ollama/YOUR_INSTALLED_MODEL \
  --prompt "Reply with exactly: pong" --json
Replace YOUR_INSTALLED_MODEL before running it; it is a placeholder, not a tag to download. Success here isolates a working model route. If ordinary agent chat still fails, investigate the larger agent workload and tool compatibility instead of treating the endpoint as broken.
Ollama's OpenClaw integration guide offers ollama launch openclaw as an alternative integrated setup. It can install and configure OpenClaw, choose a model and enable Ollama web search. It recommends at least 64K context for local agent use. That recommendation and OpenClaw's 16K discovery threshold describe different things: workload guidance and eligibility. Passing the smaller threshold does not guarantee acceptable operation at the larger budget.
If you use the launcher, inspect the resulting model and web settings rather than combining it blindly with manual onboarding. Local inference with remote web search is a mixed data path. More context also consumes resources; use the Ollama configuration guide to understand active allocation before increasing it.
Add Telegram without publishing a credential
Create a bot through the exact @BotFather account. Telegram's official bot tutorial explains token creation and why the token must be protected. Keep it in private local configuration or the supported secret mechanism, never in screenshots, source repositories or a public tutorial.
OpenClaw's Telegram setup guide supports config, a token file and the default-account environment fallback. For a first deployment, use the local configuration UI to enter the token so it is not placed in a shell command's history. If the Gateway is a service, a variable set only in your interactive terminal will not configure that already running process.
Start with pairing for the first DM. Send your bot a message from your own account, then inspect and approve the expected request on the Gateway host:
openclaw pairing list telegram
openclaw pairing approve telegram YOUR_PAIRING_CODE
openclaw channels status --probe
Approve only the request corresponding to your own message. The pairing code is short-lived. Telegram bot authentication and human admission are separate: a correct bot token identifies the bot; pairing identifies a sender allowed to enter the configured DM workflow.
Turn the first pairing into an explicit owner policy
The Telegram access-control reference recommends an explicit numeric allowlist for one-owner bots. Read your own user ID from the pairing reply or the corresponding senderUserId log entry. Do not use a phone number, bot ID, username or group chat ID in its place.
The following is a configuration fragment to merge into the existing configuration. Preserve the token and other settings; replace the example numeric string with your verified user ID:
{
  "channels": {
    "telegram": {
      "enabled": true,
      "dmPolicy": "allowlist",
      "allowFrom": ["123456789"],
      "groupPolicy": "disabled"
    }
  }
}
The number is synthetic. Keeping groups disabled makes the first acceptance boundary easy to reason about. DM approval does not automatically authorize a sender in every group. Add a group only as a separate change with verified group and sender identities.
Do not broaden access to open or add a wildcard simply to make a silent bot reply. Silence can be an intended refusal. Inspect channel status, the admission rule and the sender identity before changing permissions.
Validate configuration and inspect the effective tool boundary
OpenClaw reads JSON5 from ~/.openclaw/openclaw.json unless an alternate path is configured. The configuration reference explains strict validation: unknown keys and invalid values can prevent startup. Merge a small change, inspect the exact path and then check diagnostics.
openclaw doctor
openclaw gateway status
openclaw security audit
Start with inspection. doctor –fix and security audit –fix are repair operations, not interchangeable with their read-only checks. Preserve the existing configuration and understand a proposed repair before applying it. A green dashboard is not proof that every optional plugin has the intended permissions.
For the initial text-only exercise, keep command execution, browser operation and external write integrations outside the permitted workflow. Inspect the effective tools and agent-level overrides. A prompt saying “do not modify files” is an instruction; it is weaker than actually withholding a write or execution capability.
The security CLI checks dangerous exposure, tool policy, shared-session risks and other configuration issues. Deep audits add live checks. Resolve relevant findings, then repeat the bounded task. A passing audit is evidence about the checked configuration, not a guarantee against every future prompt or plugin.
Use an acceptance exercise with both positive and negative results
This original practice task uses fictional data:
At 08:10, scanner A could not reach the application.
A spare scanner worked.
At 08:25, scanner A reconnected after a restart.
No packet capture was taken. The owner is not assigned.

Rewrite as a concise handover. Preserve times and observations.
List missing evidence separately. Do not infer a root cause.
Do not run commands, send messages or change any system.
Run it in local chat first, then from the admitted Telegram account. Inspect whether both timestamps, the spare-scanner observation and missing owner survive. A claim that the restart proved a network fault is unsupported. An answer that invents a responsible engineer fails even if the formatting looks professional.
Then, if you have a second account you control, send a harmless message from that unapproved identity. The intended result is rejection or blocked admission under the configured policy. Do not loosen the policy to obtain a response. Record the observed result and sender identity privately.
Finally request an action outside the practice boundary, such as preparing a draft rather than sending it. Review the effective capability and whether any actual effect occurred. This is a bounded configuration check, not permission to probe another person's bot or operational system.
Separate the record into installation health, response fidelity and action authorization. A deployment can pass one and fail another. This prevents “the bot answered” from becoming the only release criterion for an assistant that can later acquire powerful tools.
Classify a failure before reinstalling
If the dashboard cannot reach the Gateway, inspect service ownership, listener and the connection configuration. If local chat works but Telegram does not, inspect bot credentials, channel readiness and sender admission. If lean inference works but agent chat fails, inspect context, tool support and the agent configuration.
If model inventory is empty, compare the provider address and loaded model state. If a normal response arrives from an unexpected provider, inspect defaults, session overrides and fallbacks. A reinstall can erase useful evidence without repairing the routing decision.
The channel CLI reference provides focused channel inspection:
openclaw channels status --probe
openclaw logs --follow
Read only the log interval relevant to your test and stop following once the evidence is collected. Token, permission and network errors are different classes. Do not publish raw logs containing chat text or credentials. Save the exact sanitized error, runtime version, provider route and last successful check.
After a token rotation, update the credential that the running service actually uses. After a service-environment change, restart that service. After a schema rejection, correct the specific field rather than replacing the complete configuration with a generic online sample.
Keep an installation acceptance record
Record the OS environment, OpenClaw version, service owner, active configuration, provider endpoint, exact model, admitted sender and enabled capabilities. Preserve the local chat result, the permitted Telegram result and the blocked-sender result separately. A successful first reply is the starting point for operation, while these observations make the installation reproducible.
Continue with the OpenClaw operations guide for routine inspection, configuration changes, backup and recovery. It separates runtime health from workflow correctness and explains why an uncertain external write must be inspected before retrying.
For practical research, document extraction, coding, recurring reports and a content workflow based on AKOS, read the OpenClaw use cases guide. Add one bounded workflow after this installation baseline is recorded.
Evidence and test scope
The installation commands and configuration behavior were checked against current official documentation. The staged acceptance method and fictional incident are authored operational exercises. This article does not claim that a live OpenClaw deployment, Telegram bot or cross-platform installation was executed during writing. The featured logo is supplied by OpenClaw’s official documentation (https://docs.openclaw.ai/); the diagram shows system boundaries and does not represent measured traffic or a product screenshot.